Synchronizing Files Between your Desktop and Laptop over SSH
My main computer is an Intel NUC6i5SYK. I call this my “desktop”, but as far as mobility goes, it’s much easier to carry around than most laptops. For working on the go, I have an HP Stream 14, mainly because it has a ~10h battery life and no moving parts (e.g. no fan). I’m pretty sure it was designed as an internet device - something like a Chromebook, but with Windows.
Nevertheless, the first thing I did was to install Ubuntu on it, and not only I have used it to develop Android apps, but the Android emulator runs with hardware accelerated virtualization!
Of course, when you work on multiple devices, data synchronization can be challenging. In the past, I wrote an article about backing up your data using Back In Time. Back In Time is an excellent tool, if your goal is to retain a history of snapshots that you can revert to, in case something goes awfully wrong. However, my requirements are for a tool that can synchronize my data from my desktop to my laptop, just before I leave the house, and vice versa when I’m back.
Meet Grsync
Grsync, just like Back In Time, is a GUI for the well-known Unix utility rsync, but without maintaining a history of snapshots. It’s powerful, yet simple to use.
So here’s the plan: We’ll setup our desktop as an SSH server, and configure it in such a way, so that we can login into it from our laptop. For additional security, we’ll restrict connections only to those originating from within our local network (e.g. Wi-Fi). Our laptop will act as an SSH client, that can connect to our desktop on demand, and wirelessly transfer files both ways. Then, we’ll install Grsync on our laptop, to take advantage of rsync differential file synchronization, and set it up to copy the right files to the right locations, at the click of a button. Everybody got that? Great.
Setup OpenSSH client (Laptop)
Before we can SSH to our desktop, we’ll need to be able to authenticate (or prove our identity) to our desktop. We’ll use a method called public key authentication, which is much more secure and convenient than using plain passwords.
In summary, we’ll generate a public/private key pair on our laptop and “give” the public key to our desktop, which can then be used to identify us on each login attempt.
Generate your key pair on your laptop:
mkdir ~/.ssh
chmod 700 ~/.ssh
ssh-keygen -t rsa
The above will generate a public/private RSA key pair. Your public key can be found in ~/.ssh/id_rsa.pub; make a copy of its contents somewhere (e.g. USB drive), since you’ll be transferring it over to your desktop in the next step.
A valid key would resemble the one below:
cat ~/.ssh/id_rsa.pub
ssh-rsa MIIBIjANBgkqhkiG9w0BAQEFAAOCAQ8AMIIBCgKCAQEAiCLEC2IVzIu4qgb7OexNZeJO8U4Mfk/rF6/NsQxckB68SYytrgrOX4QIeH4Xzh5vG4hBp5P6PoMKpDS0b9c2v5SSAwSBbE0N23XzJynZVdwAfUMidqTfF2tDE2oH+ihSxgCeCDlb35B2U5+TJfmSUP9QTGgJVVFd6d9R3W9UYETDDcSACNrQuUsrVzyWCE4aDskojTCK8Qs6jSpDAWaiQAvRcCX2gmuDnfcjw4W7d4l3Y48bav5wCatRHUFKo6AGxJUaqod7ZUX2ito16TZrUMPTKsUBxYi5s95KnWvTXq2sEW5JO3sIBiezER+KijAr3XGutdgQ5yBUX2dU78m8LQIDAQAB panos@LAPTOP
Setup OpenSSH server (Desktop)
On your desktop, append the public key that you copied in the previous step to your local user’s authorized keys list.
cat id_rsa.pub >> ~/.ssh/authorized_keys
Install OpenSSH server:
sudo apt install openssh-server
And modify /etc/ssh/sshd_config:
sudo nano /etc/ssh/sshd_config
PasswordAuthentication no
RSAAuthentication yes
PubkeyAuthentication yes
UsePAM no
AllowUsers panos@192.168.0.0/16
In the above configuration, we are restricting SSH login to user panos and only from within our home network. In the unlikely event your local user has a different name, modify as necessary. In case you don’t know who you are:
whoami
panos
Restart OpenSSH server for the changes to take effect:
sudo service ssh restart
Configure Grsync
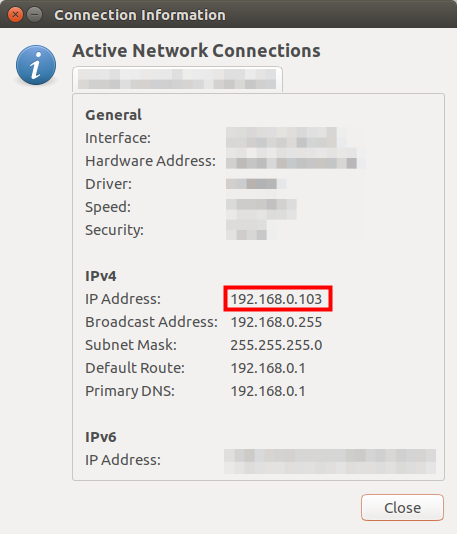
Your laptop should now have SSH access to your desktop. To test, ensure that both your devices are connected to your local network (e.g. Wi-Fi router), and then execute the following on your laptop:
ssh panos@192.168.X.X
You should replace the username with your own and the IP address with your desktop’s IP address within your home network (Tip: starts with 192.168).
If the login was successful, the machine name on your prompt string will change to reflect your desktop’s name:
panos@LAPTOP:~$ ssh panos@192.168.0.103
The authenticity of host '192.168.0.103 (192.168.0.103)' can't be established.
ECDSA key fingerprint is SHA256:LPFi3ZrrCYQVsVUPzjOHv+ZjyxCHlVY3ZBVFerVCP7k.
Are you sure you want to continue connecting (yes/no)? yes
panos@DESKTOP:~$
You can now execute commands on your desktop, just like if you had logged in locally. For now, type exit to close the connection.
Install Grsync on your laptop:
sudo apt install grsync
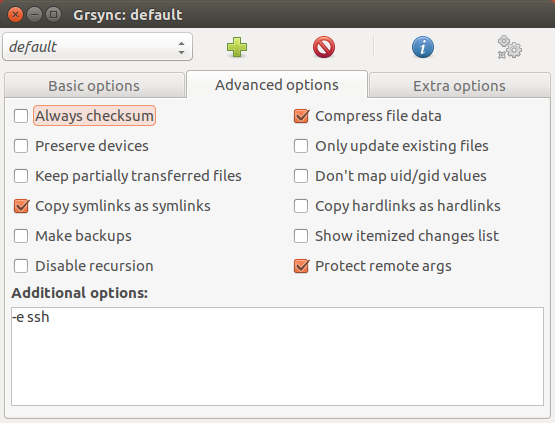
Launch Grsync and select the source/destination folders you wish to synchronize and rsync options, as required. In the example below, the destination path points to the remote (desktop) computer.
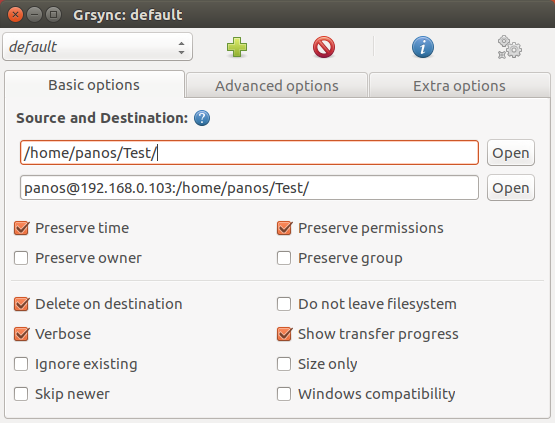
When you are ready, click on the execute button on the upper right corner.
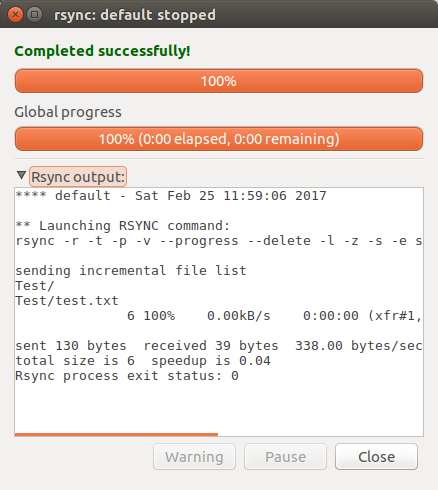
That’s it! But what if you want to perform synchronization in the opposite direction (desktop to laptop)? Easy, just swap source and destination paths.
If you want to learn more about rsync and it’s command line options, you can check the documentation here.