Setting up TypeScript with ESLint & Prettier from Scratch
In my previous tutorial, we created a Node.js project with ESLint and Prettier from scratch. In this tutorial, we are going to do the same, but we’ll setup our development environment for using TypeScript, instead of JavaScript.
TypeScript is a superset of JavaScript developed by Microsoft that adds optional static typing to JavaScript. TypeScript is safer than JavaScript because it can automatically verify that our code is free of type errors. Furthermore, it is more convenient to work with, since it enables code autocompletion in most IDEs.
Installing NVM
Just like my previous tutorial, we’ll start by installing Node Version Manager (NVM). Since it’s rare that all of our projects will require the same Node.js version, it is not practical to have a global Node.js installation, so we’ll use NVM for managing our installations and to automatically switch to the correct version as required.
NVM can be installed by downloading and running the latest installation script in NVM’s documentation.
curl -o- https://raw.githubusercontent.com/nvm-sh/nvm/v0.39.5/install.sh | bash
You will probably get a message saying to close and reopen your terminal, so make sure to do that. Then install Node v20.7.0.
nvm install 20.7.0
Add the Node version to .nvmrc.
echo "20.7.0" > .nvmrc
nvm use
Now using node v20.7.0 (npm v10.1.0)
Installing TypeScript
First, we should initialize npm.
npm init
You will be asked a few questions about your project (just press Enter to accept the defaults) and npm will create a package.json.
We can now install TypeScript as a development dependency.
npm install typescript --save-dev
TypeScript needs to be transpiled to JavaScript before we can run our program in Node.js. But we have to configure the TypeScript compiler.
Run the command below to create a new TypeScript configuration file tsconfig.json in your project’s root directory. Npx is npm’s package runner - it will try to find a package locally, or alternatively download it from npm, and then run it.
npx tsc --init
There are many tsconfig properties, which are explained in detail in TypeScript’s documentation. For this tutorial, we’ll use the configuration below:
{
  "compilerOptions": {
    "target": "es2022",
    "module": "commonjs",
    "outDir": "dist",
  },
  "include": ["src"],
  "exclude": ["node_modules"],
}
target: The ECMAScript version to transpile TypeScript to. It should be compatible with our Node.js version, for example, Node v20 supports ES2022 features.module: Sets the module system for the transpiled code. We’ll be usingcommonjs, but you could also trynodenext, as recent versions of Node fully support ECMAScript modules.outDir: Output directory for JavaScript code.include: Location of our TypeScript source files.exclude: Paths to exclude from processing.
Running npx tsc will read the tsconfig.json configuration and transpile TypeScript to JavaScript. We can add our build command to package.json.
{
  ...
  "scripts": {
    "build": "npx tsc"
  },
  ...
}
Installing ESLint
Install ESLint and the TypeScript parser/plugin from npm.
npm install eslint @typescript-eslint/parser @typescript-eslint/eslint-plugin --save-dev
eslint: The ESLint library.@typescript-eslint/parser: ESLint parser for converting TypeScript to ESLint-compatible code.@typescript-eslint/eslint-plugin: Set of recommended TypeScript rules for the linter.
Before using ESLint we need to create a configuration file. Running the command below will ask you some questions and create the file for you.
npm init @eslint/config
Choose the following answers:
✔ How would you like to use ESLint? · problems
✔ What type of modules does your project use? · commonjs
✔ Which framework does your project use? · none
✔ Does your project use TypeScript? · Yes
✔ Where does your code run? · node
✔ What format do you want your config file to be in? · JSON
The config that you've selected requires the following dependencies:

@typescript-eslint/eslint-plugin@latest @typescript-eslint/parser@latest
✔ Would you like to install them now? · No
Then modify .eslintrc.json.
{
  "root": true,
  "env": {
    "es2022": true,
    "node": true
  },
  "extends": [
    "eslint:recommended",
    "plugin:@typescript-eslint/recommended"
  ],
  "plugins": [
    "@typescript-eslint"
  ],
  "parser": "@typescript-eslint/parser",
  "parserOptions": {
    "ecmaVersion": 2022
  },
  "ignorePatterns": [
    "node_modules/",
    "dist/"
  ],
  "rules": {}
}
root: Only use the.eslintrc.jsonin the current directory. By default ESLint will also search in parent directories, all the way up to root/, and merge any configuration files it finds.env: Provides global variables for the defined environments.extends: Extends our base configuration file with rules from other files.plugins: The plugins we are using to extend our base configuration.parser: Custom parser to convert our code into ESLint compatible code.parserOptions: Defines the ECMAScript version syntax to be supported by the linter.ignorePatterns: Paths the linter should ignore.rules: Our custom linter rules, which override the defaults.
Installing Prettier
ESLint checks our code for syntax and style errors, but we have to fix any issues it finds manually. To automatically format our code to conform to our styling rules, we can use Prettier.
npm install prettier --save-dev
Since some ESLint styling rules might conflict with Prettier, we disable them with eslint-config-prettier.
npm install eslint-config-prettier --save-dev
We also need to modify .eslintrc.json and add the prettier rule overrides as the last entry in the ESLint extensions list.
{
  ...
  "extends": [
    "eslint:recommended",
    "plugin:@typescript-eslint/recommended",
    "prettier"
  ],
  ...
}
Prettier already has some built-in rules. To override the preset rules, we have the option to create a custom configuration file.
Setting up ESLint and Prettier in VS Code
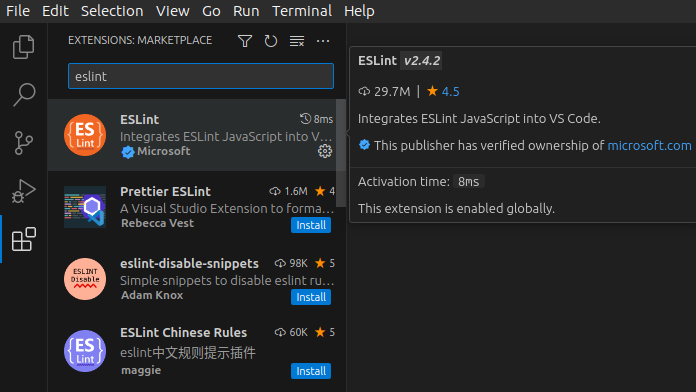
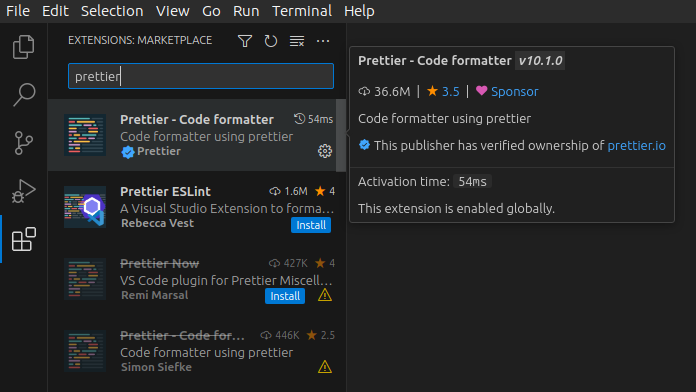
To use ESLint and Prettier in VS Code we need to install their respective VS Code extensions. Switch to the extensions tab, then find and install ESLint and Prettier.
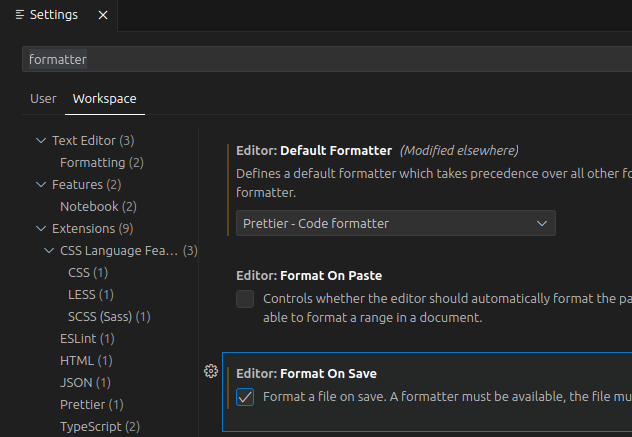
VS Code has several built-in code formatters, so we need to select the one we want to use.
Go to File → Preferences → Settings and type formatter in the search box. Switch to the Workspace tab (instead of User) and select Prettier as the Default Formatter from the drop-down list. Also, tick the Format On Save checkbox.
VS Code should create a .vscode directory with custom settings that apply only to this project. We can open .vscode/settings.json to view the local settings.
{
  "editor.defaultFormatter": "esbenp.prettier-vscode",
  "editor.formatOnSave": true
}
Create an app
Let’s create a simple application to test the TypeScript compiler.
This is the directory structure of our project:
.
└─dist
└─src
│ ├─app.ts
│ └─MyClass.ts
└─.eslintrc.json
└─package.json
└─tsconfig.json
In the src directory, create a file MyClass.ts.
export class MyClass {
  name: string;

  constructor(name: string) {
    this.name = name;
  }

  getMessage(): string {
    return `Hello ${this.name}`;
  }
}
In the same directory, also create app.ts.
import { MyClass } from "./MyClass";

const myInstance = new MyClass("world");

console.log(myInstance.getMessage());
Run the TypeScript compiler.
npm run build
The TypeScript compiler should transpile our code to JavaScript in the dist directory. We can confirm by opening dist/app.js.
"use strict";
Object.defineProperty(exports, "__esModule", { value: true });
const MyClass_1 = require("./MyClass");
const myInstance = new MyClass_1.MyClass("world");
console.log(myInstance.getMessage());
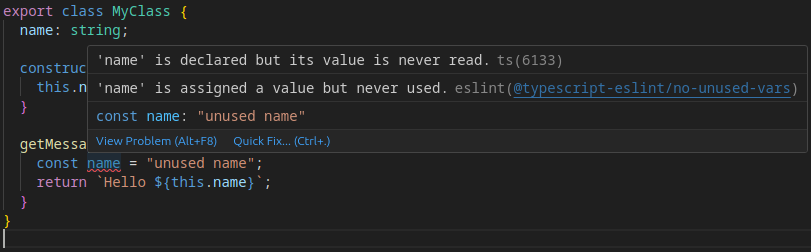
Also, let’s confirm that our linter works. Create a variable that is not used anywhere in the code and ESLint should immediately complain.
We can run our app with node dist/app.js. Add the command to package.json.
{
  ...
  "scripts": {
    "build": "npx tsc",
    "start": "node dist/app.js"
  },
  ...
}
Finally, run our app.
npm start
Hello world
Happy coding!