Creating a Rust Project from Scratch for Node.js Developers
In this tutorial we’ll walk through creating a new Rust project from scratch in Visual Studio Code, giving you a fully configured, ready‑to‑code development environment. It’s geared toward developers who are experienced with Node.js but want to start exploring Rust for web development. I’ll follow a structure similar to my earlier tutorial, Creating a Node.js Project with ESLint & Prettier from Scratch, and in a follow‑up post will dive deeper into building web applications with Rust.
Installing Rust via Rustup
In the Node.js ecosystem, version management is typically handled with tools like Node Version Manager (NVM). For Rust, the corresponding tool is rustup, which is the official toolchain manager that installs Rust and allows switching between different versions with ease.
Rustup can be installed by downloading and running the installation script from the official Rust programming language website. At the time this tutorial was written, the command was:
curl --proto '=https' --tlsv1.2 -sSf https://sh.rustup.rs | sh
Accept the default options when prompted and rustup should install several binaries into ~/.cargo/bin. After reloading the terminal for the updated PATH to take effect, confirm the installation by running:
rustup --version
rustc --version
cargo --version
rustc is the Rust compiler that turns source code into an executable binary, while cargo is Rust’s package manager, similar to what npm does for Node.js, but it is also a build tool, since it can compile code using rustc.
Creating a Rust Project
Let’s create a directory for our new project.
mkdir my-project
cd my-project
And then initialize a Rust project.
cargo init
This creates the following directory structure:
my-project/
├── Cargo.toml
└── src/
    └── main.rs
Cargo.toml stores the project’s metadata and its dependencies, just like package.json in Node.js. The main() function defined in src/main.rs serves as the entry point of the application. This is the entry point for every standard Rust binary project.
The program can be compiled and executed using Cargo, which invokes rustc under the hood for the compilation step.
cargo run
By default, Cargo creates a debug build of the program in the target/ directory, but we can also create optimized builds with cargo build --release. The resulting binaries are mostly statically linked (with some exceptions), which means they can be copied and run on any machine with a compatible OS and CPU.
target/
├─ debug/
│   └─ my-project # debug binary
└─ release/
    └─ my-project # release binary
If you want to fix the Rust compiler version for your project, simply create a rust-toolchain.toml file in the root of your project with the following content:
[toolchain]
channel = "1.92.0"
The specified Rust version will be automatically downloaded and used by rustup whenever you run cargo run.
Setting Up Code Formatting and Linting in VS Code
Visual Studio Code doesn’t include native Rust support, so the first step is to install the rust-analyzer extension, which enables IntelliSense (autocomplete and more) for Rust. This extension is essentially required for any Rust project.
Rust ships with its own code formatter, rustfmt, which functions much like Prettier does in Node.js. Running the formatter from the command line will automatically format the entire crate.
cargo fmt
In most cases you will want your files to be formatted automatically each time you save them in VS Code. To enable this, add the following configuration to your workspace settings in .vscode/settings.json:
{
  "[rust]": {
    "editor.defaultFormatter": "rust-lang.rust-analyzer",
    "editor.formatOnSave": true
  }
}
The default formatting rules can be customized by adding a rustfmt.toml file to the root of your project.
max_width = 80
tab_spaces = 2
hard_tabs = false
By this point, you have probably noticed that TOML files are Rust’s favorite way to handle configuration, much like JSON in Node.js. The TOML spec was created by Tom Preston-Werner, a GitHub co-founder, while TOML stands for Tom's Obvious, Minimal Language. If naming a format after yourself sounds a bit self‑congratulatory, see “Linux”.
Because we’ll be dealing with TOML files frequently I recommend installing the Even Better TOML extension for VS Code, though it isn’t strictly required.
Rust also ships with it’s own linter (Clippy), which can be run on the command line.
cargo clippy
Customizing linting in Rust works differently from ESLint’s extensive configuration files. While you can set some workspace-wide flags in Cargo.toml, Rust developers generally prefer inline attributes (the equivalent of ESLint comments) or CLI arguments to override linter behavior on a per‑case basis.
To have rust-analyzer run Clippy automatically whenever you save a file, add the following configuration to your workspace settings .vscode/settings.json.
{
  ...
  "rust-analyzer.check.command": "clippy"
  ...
}
Testing the Development Environment
With the development environment set up, we can now verify that everything works. Open the src/main.rc file and replace its contents with the following code:
fn main() {
println!("Hello, world!");
}
Notice that the println! macro is left-aligned with no indentation. If rust-analyzer was setup properly in the previous steps, after saving the file it should automatically reformat the code according to the rules defined in rustfmt.toml.
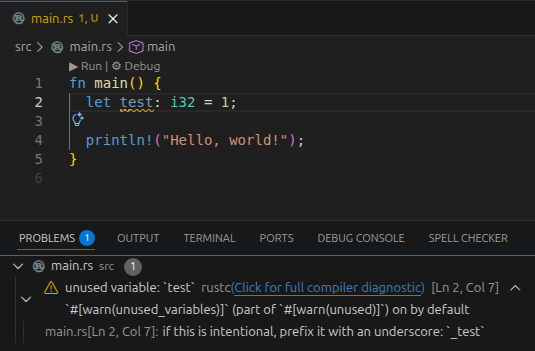
Next, let’s test the linter. Open the src/main.rc file again and replace its contents with the following code:
fn main() {
  let test: i32 = 1;

  println!("Hello, world!");
}
After saving the file, the Problems pane should display a warning indicating that a variable was declared but never used. Also, the unused variable should be underlined in the editor.
Debugging (optional but highly recommended)
To debug your project, start by installing the CodeLLDB extension in VS Code. Once the extension is installed, you’ll need to setup a launch configuration for the debugger. Create this configuration in .vscode/launch.json:
{
  "version": "0.2.0",
  "configurations": [
    {
      "type": "lldb",
      "request": "launch",
      "name": "Debug Rust",
      "program": "${workspaceFolder}/target/debug/my-project",
      "args": [],
      "cwd": "${workspaceFolder}",
      "stopOnEntry": false
    }
  ]
}
Make sure to build your program.
cargo build
Then open the src/main.rc file and set a breakpoint by clicking in the empty space just left of the line number where you want execution to pause. A red dot will appear indicating the breakpoint is active. Then choose Run → Start Debugging and the debugger will run your program until it reaches the breakpoint. At that point the current state of local variables can be seen on the left side of the window.

Once you’ve finished examining the program, end the debugging session by selecting Run → Stop Debugging.
Commit to Git
For the final step, we should setup version control, so make sure Git is installed on your platform.
On Ubuntu just run:
sudo apt install git
And then create an empty Git repository.
git init
A .gitignore file was already generated for us by cargo init. Let’s add the .vscode directory as well.
/target
.vscode
Finally, commit all changes.
git add -A
git commit -m "Initial"
That’s all for now. Happy coding!