Beginning Android Game Development with LibGDX
LibGDX is a open source game development framework. It is written in Java and provides a cross platform API that can target Android, iOS, Windows, Linux, Mac OS X, and other platforms. LibGDX is not a full-blown game engine like, e.g. Unity, but a Java framework, which you can nevertheless use to make a complete game from scratch.
The main difference between a framework and a library is in the control flow. A library provides a collection of functions and class definitions that you can reuse in your application. You call the library from your application, and when you’re done, control is returned back to your code. In a framework, the application is already there implementing some built-in behavior, while your code is used to customize that behavior. The framework calls your code when necessary and then control is returned back to the framework. In other words, you call a library, but a framework calls you.
A big advantage of libGDX is that it allows you to build and test your application on the desktop, so you are free to ignore the slow Android emulator throughout most of the development process. Every now and then you deploy to your phone or emulator, just to check that everything works as expected, and that’s it. Furthermore, libGDX has an active user community on the forums that can help you when you get stuck. Oh, and did I mention it’s open source?
Prepare for development
LibGDX supports many popular IDEs. Since we’ll be developing an Android game, we are going to use Android Studio. Start by reading the instructions here, and then install Android Studio along with the JDK. This tutorial is not meant as an introduction to either Java or Android Studio, so make sure you are familiar with both before proceeding any further.
Once you have installed the IDE, the easiest way to start a new libGDX project is to download and run the project setup tool.
java -jar ./gdx-setup.jar
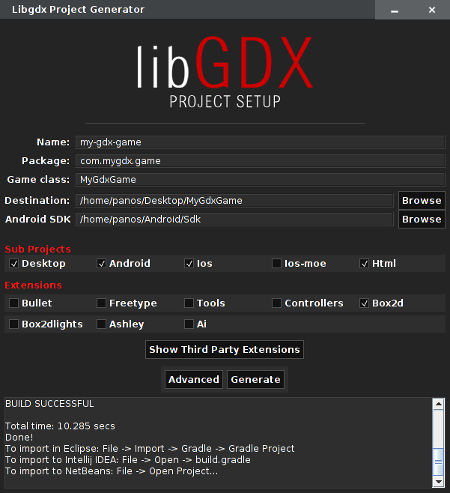
Select a destination directory for your project and the path to the Android SDK. If you are not sure where the Android SDK is located, you can find the path by opening the SDK manager in the Android Studio. When you are ready, click on Generate.
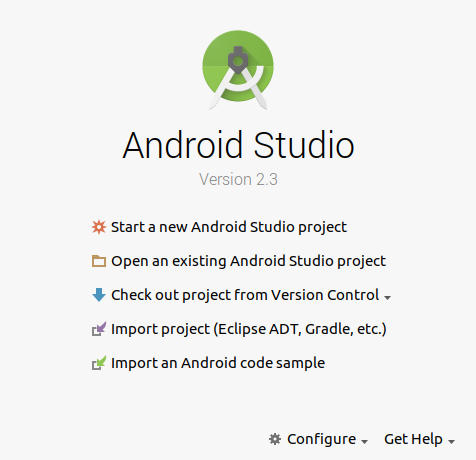
It should take a few seconds for the build to complete. Once it is done, open the Android Studio. If you don’t see the screen below, make sure to close any open projects first. Then, click on Import project and pick the directory you selected on the previous step.
Running the demo
The project generator that we used above includes a demo application. But before we run the demo, let’s have a look at the libDGX project structure. The core directory is where we implement the actual logic of our game. The rest of the directories are used to customize each of the target platforms (Android, iOS etc.).
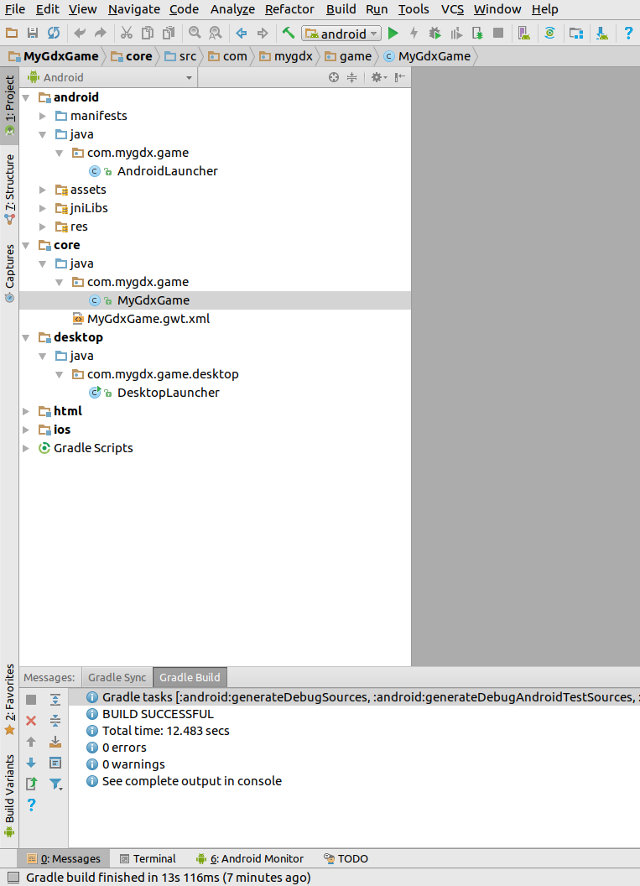
The demo is implemented in the MyGdxGame class. All methods within that class (create, render etc.) represent various states of the libGDX application life-cycle and they are automatically called by our application during runtime as necessary.
public class MyGdxGame extends ApplicationAdapter {
	SpriteBatch batch;
	Texture img;

	@Override
	public void create () {
		batch = new SpriteBatch();
		img = new Texture("badlogic.jpg");
	}

	@Override
	public void render () {
		Gdx.gl.glClearColor(1, 0, 0, 1);
		Gdx.gl.glClear(GL20.GL_COLOR_BUFFER_BIT);
		batch.begin();
		batch.draw(img, 0, 0);
		batch.end();
	}

	@Override
	public void dispose () {
		batch.dispose();
		img.dispose();
	}
}
When our application is first created, it initially calls the create method. In the demo above, create is used to instantiate a SpriteBatch for drawing to the screen (#7) and create a Texture from a local image file (#8). A Texture is just an image that is loaded into GPU memory. When the time comes to draw to the screen (multiple times per second), the render method is called, in which we clear the screen (#14) and then draw the Texture (#16).
For good reasons, most of the resources we use in libGDX are not managed by the JVM garbage collector, so they have to be disposed of manually. When the time comes to do that, our application calls on dispose to release any allocated resources (#22,#23).
In addition to the events seen above, libGDX defines other life-cycle events that we don’t use in this example. The ApplicationAdapter, from which we derive our class, internally implements default behaviors for any unused events.
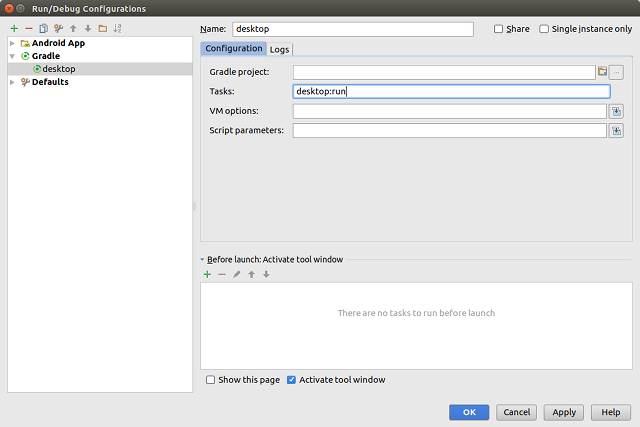
Before we run the demo game, we should first create a new run configuration for the desktop. Go to Run→Edit configurations, add a new Gradle configuration for the desktop as shown in the screenshot, and then click OK.
You should now be able to build and run your project. If not already selected, select the desktop configuration, and then click on the green Run button. The demo game should pop up in a new window.
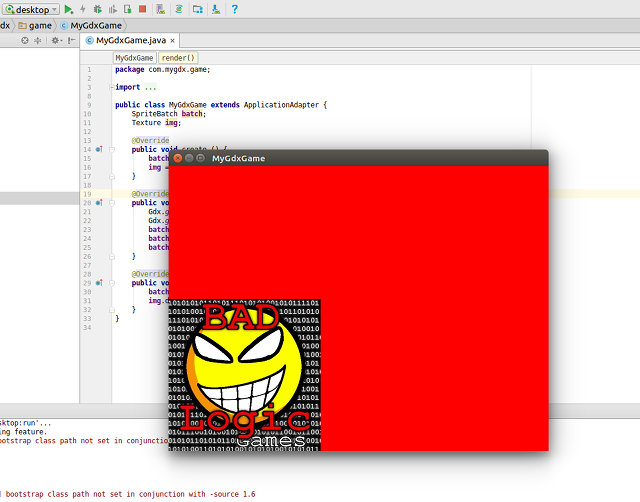
Boring, eh?
Let’s make things more interesting
We are going to modify the game by splitting the screen into 6 columns. At a regular interval, we’ll pick a random column to place a new sprite, which we’ll then move towards the top of the screen at constant speed. We’ll also allow our sprite to react to input, rotating itself on each touch event.
To make our life easier, we are going to use something called an OrthographicCamera. The benefit of using a camera is that we won’t have to worry about the actual dimensions of our application window (or phone screen). If we create a camera with a viewport size of, e.g. 100x100, and draw something at (X=50, Y=50) that point will always be at the center of our viewable area, whether our screen resolution is 100x100 or 1920x1080. So we’ll be drawing to our fixed size camera view, and then let libGDX scale and position everything within our application window.
// Create a camera with orthographic projection
camera = new OrthographicCamera();
// Set the viewport to fit the screen resolution and center camera at the center of the screen
camera.setToOrtho(false);
Since we use a camera, we have to notify our SpriteBatch that it should render to our camera view, before using it for any drawing operations.
// Show the SpriteBatch where to render stuff
batch.setProjectionMatrix(camera.combined);
At a regular interval (SPAWN_DELTA), we create a new Sprite in a random column, initially positioned below our viewable area. A Sprite is just a Texture that you can move around.
// Create new Sprite if time since last spawn > SPAWN_DELTA
if (now - lastSpawn > SPAWN_DELTA) {
    // Choose a random column
    int column = MathUtils.random(0, COLUMNS - 1);

    // Create a new Sprite, set dimensions and position below our viewable area (-blocksize)
    Sprite block = new Sprite(img);
    block.setBounds(column * blockSize, -blockSize, blockSize, blockSize);
    block.setOriginCenter();

    // Insert the Sprite in our array for future reference
    blocks[column].add(block);
    lastSpawn = now;
}
Whenever there’s a touch event, we find which one of our Sprites is at that location and rotate it by 90º. Touch events are in screen coordinates, so we first have to transform to our camera coordinates using camera.unproject.
@Override
public boolean touchDown(int screenX, int screenY, int pointer, int button) {
// Translate screen coordinates to our camera coordinates
Vector3 position = camera.unproject(new Vector3(screenX, screenY, 0));

// Loop through all Sprites
for (int column = 0; column < blocks.length; column++) {
    for (int i = 0; i < blocks[column].size(); i++) {
        Sprite block = blocks[column].get(i);

        // If event coordinates within the Sprite, then rotate
        if (block.getBoundingRectangle().contains(position.x, position.y)) {
            block.rotate90(true);
            return true;
        }
    }
}

return false;
}
The complete MyGdxGame.java class implementation can be seen below. You can also view a comparison between this and the original version in the repository.
public class MyGdxGame extends ApplicationAdapter implements InputProcessor {
SpriteBatch batch;
Texture img;
final int SPAWN_DELTA = 1000;
// We'll split screen into 6 columns
final int COLUMNS = 6;
ArrayList<Sprite>[] blocks = new ArrayList[COLUMNS];
OrthographicCamera camera;
float blockSize;
float velocity;
long lastSpawn = 0;
@Override
public void create() {
batch = new SpriteBatch();
img = new Texture("badlogic.jpg");
for (int i = 0; i < blocks.length; i++) {
blocks[i] = new ArrayList<Sprite>();
}
// Create a camera with orthographic projection
camera = new OrthographicCamera();
// Set the viewport to fit the screen resolution and center camera at the center of the screen
camera.setToOrtho(false);
// Calculate Sprite size and velocity
blockSize = camera.viewportWidth / COLUMNS;
velocity = camera.viewportHeight / 200;
// Use the InputProcessor so we don't have to poll for input events
Gdx.input.setInputProcessor(this);
}
@Override
public void render() {
update();
// Clear screen
Gdx.gl.glClearColor(1, 0, 0, 1);
Gdx.gl.glClear(GL20.GL_COLOR_BUFFER_BIT);
// Show the SpriteBatch where to render stuff
batch.setProjectionMatrix(camera.combined);
// Draw all sprites in a loop
batch.begin();
for (int column = 0; column < blocks.length; column++) {
for (int i = 0; i < blocks[column].size(); i++) {
blocks[column].get(i).draw(batch);
}
}
batch.end();
}
@Override
public void dispose() {
// Resources in LibGDX are not managed by the garbage collector, so they have to be disposed of manually. You've been warned!
batch.dispose();
img.dispose();
}
private void update() {
long now = TimeUtils.millis();
// Create new Sprite if time since last spawn > SPAWN_DELTA
if (now - lastSpawn > SPAWN_DELTA) {
// Choose a random column
int column = MathUtils.random(0, COLUMNS - 1);
// Create a new Sprite, set dimensions and position below our viewable area (-blocksize)
Sprite block = new Sprite(img);
block.setBounds(column * blockSize, -blockSize, blockSize, blockSize);
block.setOriginCenter();
// Insert the Sprite in our array for future reference
blocks[column].add(block);
lastSpawn = now;
}
// Loop through all Sprites
for (int column = 0; column < blocks.length; column++) {
for (int i = 0; i < blocks[column].size(); i++) {
Sprite block = blocks[column].get(i);
// Increase Y position
block.translateY(velocity);
float maxY;
if (i > 0) {
// If Y overlaps the previous Sprite, then stop
Sprite previous = blocks[column].get(i - 1);
maxY = previous.getY() - block.getHeight();
} else {
// If Y is above our viewable area, then stop
maxY = camera.viewportHeight - block.getHeight();
}
if (block.getY() > maxY) {
block.setY(maxY);
}
}
}
}
@Override
public boolean keyDown(int keycode) {
return false;
}
@Override
public boolean keyUp(int keycode) {
return false;
}
@Override
public boolean keyTyped(char character) {
return false;
}
@Override
public boolean touchDown(int screenX, int screenY, int pointer, int button) {
// Translate screen coordinates to our camera coordinates
Vector3 position = camera.unproject(new Vector3(screenX, screenY, 0));
// Loop through all Sprites
for (int column = 0; column < blocks.length; column++) {
for (int i = 0; i < blocks[column].size(); i++) {
Sprite block = blocks[column].get(i);
// If event coordinates within the Sprite, then rotate
if (block.getBoundingRectangle().contains(position.x, position.y)) {
block.rotate90(true);
return true;
}
}
}
return false;
}
@Override
public boolean touchUp(int screenX, int screenY, int pointer, int button) {
return false;
}
@Override
public boolean touchDragged(int screenX, int screenY, int pointer) {
return false;
}
@Override
public boolean mouseMoved(int screenX, int screenY) {
return false;
}
@Override
public boolean scrolled(int amount) {
return false;
}
}
You may have noticed that we have implemented more input events than we actually use (keyDown, keyUp etc.). That’s because our class implements InputProcessor and we are required to provide implementations of all methods defined by InputProcessor. Another approach would be to extend InputAdapter, and then implement just the one method we use (touchDown).
Before we test our game, there are a few more changes required. In the AndroidManifest.xml change the screen orientation from landscape to portrait:
android:screenOrientation="portrait"
Finally, in DesktopLauncher.java change the width and height of the desktop window, as shown below:
public class DesktopLauncher {
	public static void main (String[] arg) {
		LwjglApplicationConfiguration config = new LwjglApplicationConfiguration();
		config.width = 480;
		config.height = 800;

		new LwjglApplication(new MyGdxGame(), config);
	}
}
When you are ready, click on the green Run button. The game will build and pop up in a new window.
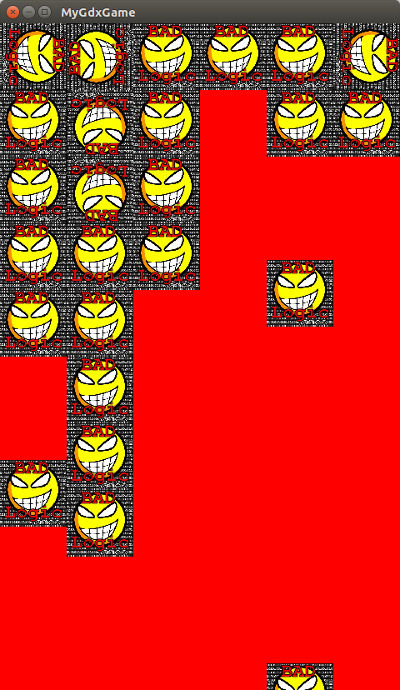
I know, right? Best game ever.
Note that resizing the window will not respect aspect ratios, so if you want to try that, expect that the sprites will get distorted.
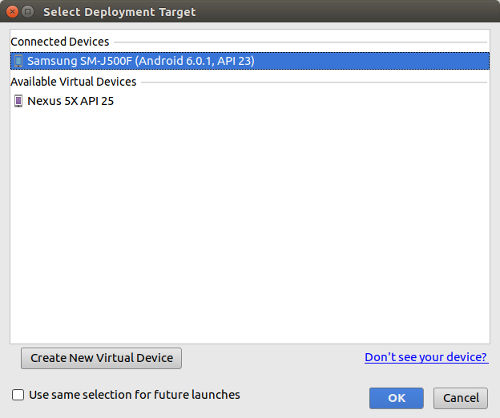
To deploy to your phone, enable USB debugging on your phone, and connect to your computer using a USB cable. Select the android configuration, and then click the green Run button for one last time. Assuming you have correctly setup Android Studio, you should see the screen below. Click on OK and the game will build and install on your phone.
To move forward, you can have a look at the excellent libGDX wiki, using the API documentation as a reference.
You can find the complete source of the above game in my GitHub repo.